Once an instrument is selected, the customer will be taken to the Rental Finalize Contract page. As explained in the rental finalize page overview, the page is comprised of four sections. In this article, we'll cover editing the Customer Details input form on the page, which appear below the Accessories, Maintenance, and Delivery Options display tables.

This section of the website is made up of 'input fields' that can be edited in your site using the topic "aeC2BRentalFinalize". Keep in mind that "aeC2BRentalFinalize" contains code for your header topics as well as the Accessories/ Maintenance/ Delivery display, so when editing this topic on the website, we recommend you copy the full topic into a separate text editor and make your changes there, before copying the topic back into your website.
Each field in the Customer Details input area corresponds directly with a database field for your customer in AIM. The form, as it comes 'out of the box' does not collect information for every field in AIM though. You can remove any unnecessary field, or add any extra fields that you want to appear on the form.
Removing an Input field
Let's talk about how to remove a field first. The first thing you need to understand is how the code works. Start by opening up the topic "aeC2BRentalFinalize" and switch to html mode.

Then copy the html out of your topic and into a text editor. We recommend using something like Notepad++ so that you can set your language to HTML and see the code easier:

To remove a form input, we just need to delete the entire chunk of html that puts the input on the page. In this example, we'll be removing "Home Phone" since most of the time, having a cell phone number is good enough. First I want to find the area of code for the "Home Phone" and show that to you:
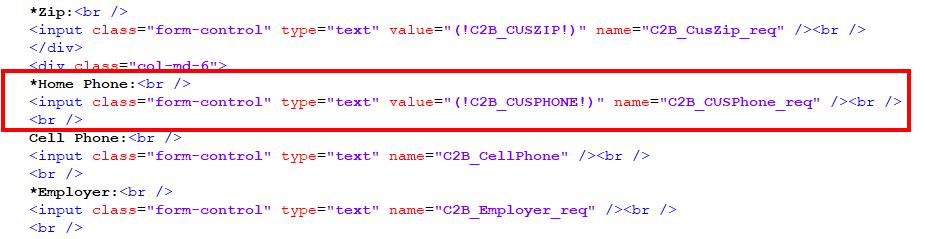
We can simply remove this highlighted area of the text, starting with "*Home Phone" and ending with the second <br/> tag.
After making the change to your code, copy the complete code back into the topic in your site, save, and refresh your store and you should see that your input field has disappeared next time you load the page.
Next let's talk about adding a field to the form and linking it up to a corresponding field in AIM.
Adding a Form Field
You can add an unrestricted number of fields to your Customer Details input form, but if you want to add a field that inputs directly into AIM, you have a finite number of possibilities, because you can only use the fields that AIM has, we can't add new fields to AIM. Let's walk through a specific example, and then we can show you the rest of your options.
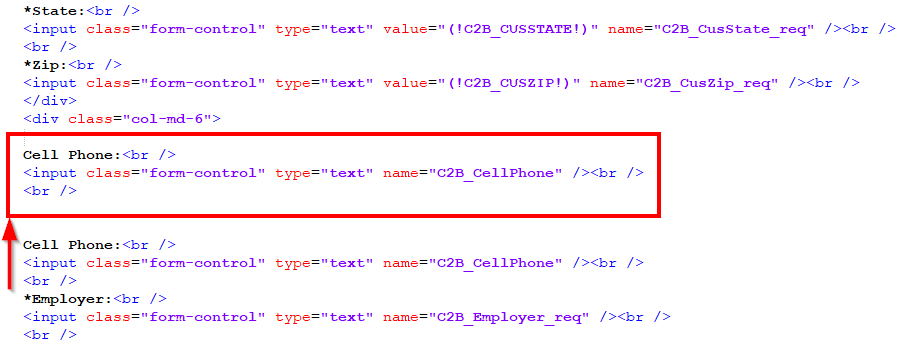
So we deleted the "*Home Phone" field, but we want to replace it with a field that collects a social security number. As in the example to remove a field, you want to start by opening the topic "aeC2BRentalFinalize" and switching to html mode so that you can copy the code into a text file for editing. Then you'll want to find the spot where the "*Home Phone" field was and I like to clear a little space in my text file to make it easier to work. My file looks something like this:

The next step I take is to copy a field that is already set up. In this case, I'll grab the "Cell Phone" code and copy it into the blank space.
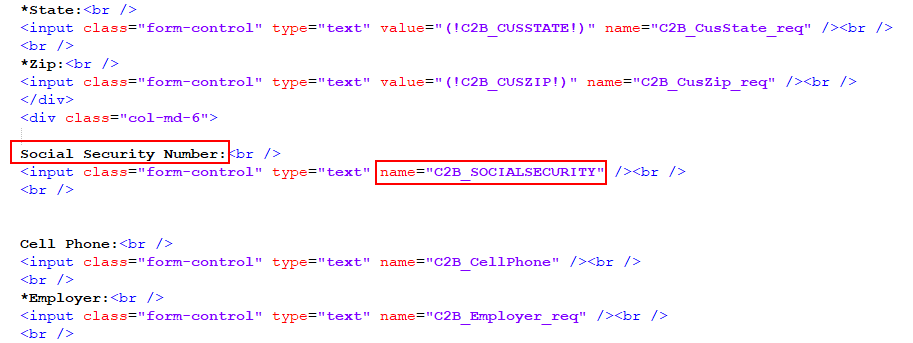
Now we only need to edit the relevant areas of this text so that it can be used for SSN instead of Cell Phone. Notice I changed the "name" as well. Below you can see a full list of names that you can use to tie this input field into a database field in AIM.
Now, I can copy this text file back into my "aeC2BRentalFinalize" topic, Save, and refresh store. The next time I load the rental finalize page, I can see the new input field and use it to complete a rental Checkout:

When this order is complete and submitted, you should be able to view it in AIM and the Social Security number should be in the appropriate client field in AIM.
But, what if a client does not fill out that field? We need to make it required, and here's how you can do that.
Making a field required
In order to make a field required, you need to add a bit of text to the name field and probably should adjust the text above the field as well. Looking back at our example for adding a field, we can see the code for Social Security field looks like this:

To make this field required, we need to add "_req" to the name and then we recommend adding a "*" to the text to indicate it's a required field. You can do this any way you want, so once you understand how it works, then feel free to be creative. Compare this image to the one above, and you should be able to see the two things that were added.

You're done. Copy this code back into the "aeC2BRentalFinalize" topic. Save the topic, refresh your store, and you should see the change on the rental finalize page. If you don't fill out this field, the website should not let you submit the order.
But, what if a I want to add a different field, that doesn't input data into the Social Security number? What if I want to add a field for Birthday instead? Here's how we can do that.
Complete list of AIM input names
Tri-Tech has provided several direct names that we can use in our Customer Details input form to direct data into a number of set fields in your AIM database. You can use these fields exactly as I used C2B_SOCIALSECURITY in the example above. Here is the complete list of "input names" that you can add to your Customer Details form.
If you use one of the following field names, active-e knows specifically where to store the collected values into the AIMsi database:
C2B_ATTENTION
C2B_BIRTHDAY
C2B_CUSNAME
C2B_CUSFIRSTNAME
C2B_CUSLASTNAME
C2B_CUSADDRESS1
C2B_CUSADDRESS2
C2B_CUSCITY
C2B_CUSSTATE
C2B_CUSZIP
C2B_CUSCOUNTRY
C2B_CUSEMAIL
C2B_CUSPHONE
C2B_EMPLOYER
C2B_SOCIALSECURITY
C2B_WORKPHONE
C2B_EXTENSION
C2B_EXTENSION2
C2B_CELLPHONE
C2B_FAX
C2B_BANKROUTINGNUMBER
C2B_BANKACCOUNTNUMBER
C2B_BANKTRANSACTIONTYPE
C2B_DRIVERSLICENSENUMBER
C2B_DRIVERSLICENSESTATE
C2B_STUDENT
C2B_RENTALNOTES
C2B_CREDITCHECKNAMEOVERRIDE – This will override the customer’s name in the credit check program.
As of AIM Storefront version 1.43 You can add a field for Birthday and it will import into the "birthday" field of AIM with the rental order. To add the Birthday field in your rental finalize page that includes a date picker widget, insert this code:  To add the Birthday field in your rental finalize page that includes a date picker widget, insert this code:
Birthday:<br />
<input class="form-control" type="date" name="C2B_BIRTHDAY" /> <br />
<br />
You should see birthday appear in AIM here.

You can also collect any other information you want, even though it won’t be mapped directly to a field in AIM. You just give it a name and precede the name with “C2B_”. The values collected will be connected with the name of the textbox and sent down to AIMsi where you can view this information and then it will be saved in the Contract Notes field.
For example:
C2B_DeliveryInstructions
C2B_SpouseName
C2B_SalaryRange
C2B_ShoeSize
C2B_WhateverYouWant
Was this article helpful?
That’s Great!
Thank you for your feedback
Sorry! We couldn't be helpful
Thank you for your feedback
Feedback sent
We appreciate your effort and will try to fix the article