**Before you begin working with Tee Sheets, you’ll need to be sure you've contacted Tri-Tech and enabled “Tee-Sheet” with AIM as an add-on to your regular AIM service.
Tee Sheets offer a ton of flexibility, while remaining very simple to use. You will only need to follow these simple steps.
TABLE OF CONTENTS
- Set Courses in AIM
- Set Time Slots in AIM
- Check your Website
- Need Help "?" popup
- Requiring Payment
- Testing Your Setup
- Admin Reservation Confirmation Email
- The AIM side of a tee time
- Course Images and Description
As a prerequisite, You will need to be sure your AIM Storefront is configured to connect to your copy of AIM. In your Storefront, go to Configuration > Settings and make sure these settings are populated with your AIM credentials.
- aeC2BEncryptionKey
- AIMsiApiKey
- *AIMsiApiVersion – should be set to 12. If you are not running version 12 of AIM, you will need to upgrade before you can use Tee Sheets.
Set Courses in AIM
Once you have your AIMStorefront website connected to AIM, and your AIM subscription set to allow Tee Sheets, you’ll need to make sure your data is input properly into AIM. To do this, open AIM and go to “Maintenance > Tee-Sheet > Course Maintenance”. If you do not see your course, you can add it by selecting the Add button at the bottom of the screen. The screenshot below shows settings for one course. If you have multiple courses, you can use the "Add" button to add your second course.  Fill out the course name in the “Description” field, the Location, and the Menu should be set to “Tee Sheet Menu” as a default. You should also set the Default Pace, in minutes, for the time it takes to complete 9 holes. You can change or edit these later, but they need to be set before you can move on to the next step.
"AE Topic" field is unused at this point.
Set Time Slots in AIM
Once your course is set in AIM, you can start to set up time slots for tee times. To configure your course tee time scheduler, you should open up your copy of AIM:

…and Navigate using the top menus to “Maintenance > Tee-Sheet > Create Time Slots” or using the graphic navigation go to “Maintenance > T-Schedule > Create Time Slots” – they will both take you to a window that has two tabs, and looks like this:

(the difference in these screens is that tab 1 is selected in the first screenshot, tab 2 is selected in the second)

You can see on the “Setup” tab for this window you have the options to set a number of important details about your course tee times that allow for the system to calculate how to make a schedule for your course.
Keep in mind that you need to set up both of the tabs in the “Create Time Slots” window, then use the button in the lower left to “Create Slots”. This will ‘set’ the information into your database. Changing anything in these tabs will require you to “Create Slots” again, and will remove any slots you’ve already created, and set a new calendar in the database, unless you use the "Time Overlay" feature, which can edit specific dates and times without changing the rest of the calendar.
Glossary for the 'Setup' tab (top right corner):
- Location - This is important if you use multiple courses spread over multiple locations and are setting up tee times for different courses. If you only have one location to manage, you won't need to change this ever.
- Entity - This is important if you run multiple courses, either in one, or multiple locations. Otherwise, leave as default.
- Date Range - When setting up tee times, be careful to set the date range for which you are working. This defaults back to one day after you create slots, so keep checking that it accurately reflects your work.
- Days of the week - If you are setting up tee times for a month, and your course is closed on Mondays, you can use the date picker to reduce your workload. A checkbox indicates that the weekday will be included.
- Time Range - When setting up tee times, the first time is the first time you will allow a group to tee off. The second time in the range is the time by which time the last players must be finished. Note that it is NOT the time that the last group will tee off.
- Min/Max People - This is the number of players you will accept, teeing off as a group.
- Increments - This is the number of minutes that it takes for a group of players to be cleared from the first tee, such that the next group can tee off. You can set one, or two values. If you set two values, your tee times will alternate. E.g. 7 minutes and 8 minutes.
In the example pictured above, the first group will tee off, then seven minutes later the next group would tee off, then 8 minutes later the next group would tee off, then 7 minutes later ... - Pace - This is the length of time it takes to clear nine holes. It must be a multiple of increments or, if using alternative values, pace must be a multiple of the sum of the two increment values.
E.g. 7 and 8 minute increments - pace must be a multiple of 15. - Time Overlay - It is ideal to use 'create slots' for blanket coverage (eg, 7 days a week, 8 am until 8 pm) but then take second/subsequent passes to write over PARTS of your slot data. (e.g. if Tuesday afternoons are held over for senior players, then a course owner might set slower increments, uncheck all boxes except Tuesday, and hit 'time overlay'. Without 'overlay' the process will delete all other knowledge about Tuesday, in this example.
Immediately after hitting “Create Slots” you should be prompted to wait until you see a confirmation that the time slots have been created. You may then exit the Create Time Slots window and you should be able to instantly see the results on your website.
Check your Website
On your website, navigate to https://yoursite.com/tsheet (using your domain name instead of ‘yoursite.com’). It may take a few moments for the page to load while the new data is being transferred from AIM to your website, but after loading this page once, the website should load much faster for each additional user. You should see a page that looks like this, showing your courses and a calendar.
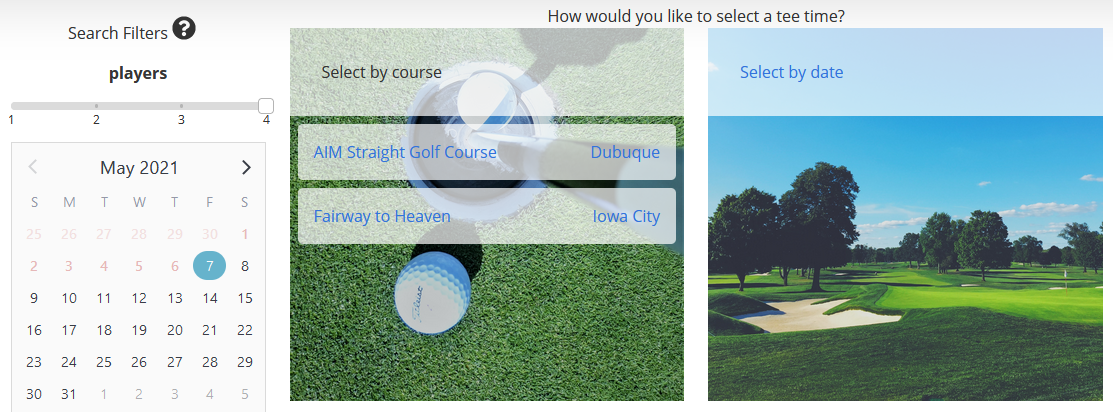
Or, if you only have one course to choose from, you may see the page with dates when the tsheet loads.

Need Help "?" popup
A new pop-up tutorial can be viewed from the Tee Sheet page by clicking the (?) button next to Search Filters. The tutorial gives information on the reservation tool for new users of Tee Sheet.
The contents of the pop-up are controlled by a new Topic: Edition.TeeSheet.Tutorial and a new Prompt: AIMSI.TeeSheet.Prompts.TutorialHeader.
The tooltip which shows when hovering over the (?) button is controlled by Prompt: AIMSI.TeeSheet.Prompts.FilterHelp.
Requiring Payment
Our Tee Sheets are set up to collect payment when a player makes a reservation, but not all of our AIM Storefronts require this functionality. To allow your website to accept online reservations but NOT require payments, you'll need to change one setting in your admin (/aesys) panel.
In your website admin, go to Confuration > Settings and search for AIMSI.TeeSheet.RequirePayment.

The site should be set to accept payments (true), but you can change this setting to (false) to allow reservations to be made without collecting payments. In this case, your players would pay for their rounds in the clubhouse before teeing off. Be sure to refresh store if you change this setting.
Testing Your Setup
To test your setup, please click on a course, select a date range and fill out the required information to schedule your first tee time in the system. You can use a fake credit card number if you do not have a payment gateway installed yet. Once you finish the process, you should see a note on the initial /tsheet page that looks like this:

Admin Reservation Confirmation Email
A reservation confirmation email can now be sent to a site administrator for new reservations.
This email is optional and is disabled by default. To enable it, set the Configuration - Settings - Email.TeeSheetReservationAdmin.Email to the email address where the confirmations should be sent.
The subject line of the email is controlled by the Prompt:Email.TeeSheetReservationAdmin.Subject and will have the number of players and the number of holes for the reservation.
The content of the email is controlled by the Topic Name specified in the Configuration - Settings - Email.TeeSheetReservationAdminTemplate . By default, this is set to Topic: Email.Templates.TeeSheetReservationAdmin .
The AIM side of a tee time
If you’d like to see how and where the reserved tee times show in your AIM software, open AIM back up and navigate to the Tee-Sheet window by going to “Modules > Daily Posting > Tee-Sheets” or by clicking the large “Tee-Sheet” button in your AIM Main Menu Home Screen. You should now have access to view Tee Sheets for any of your courses on any day. You may also use this screen to manually add and reserve tee times from AIM directly.
If you have any questions about your other options in AIM, including but not limited to processing payments, taking payments manually, editing tee times, or setting your scheduler up to have anything different than the standard setup described above, you will need to contact Tri-Tech support for more detailed training within AIM.
Course Images and Description
On the /tsheet page, once you've selected your course, you may see a "Picture Unavailable" placeholder image above your search filters. This is a spot where you can place your course image and description.
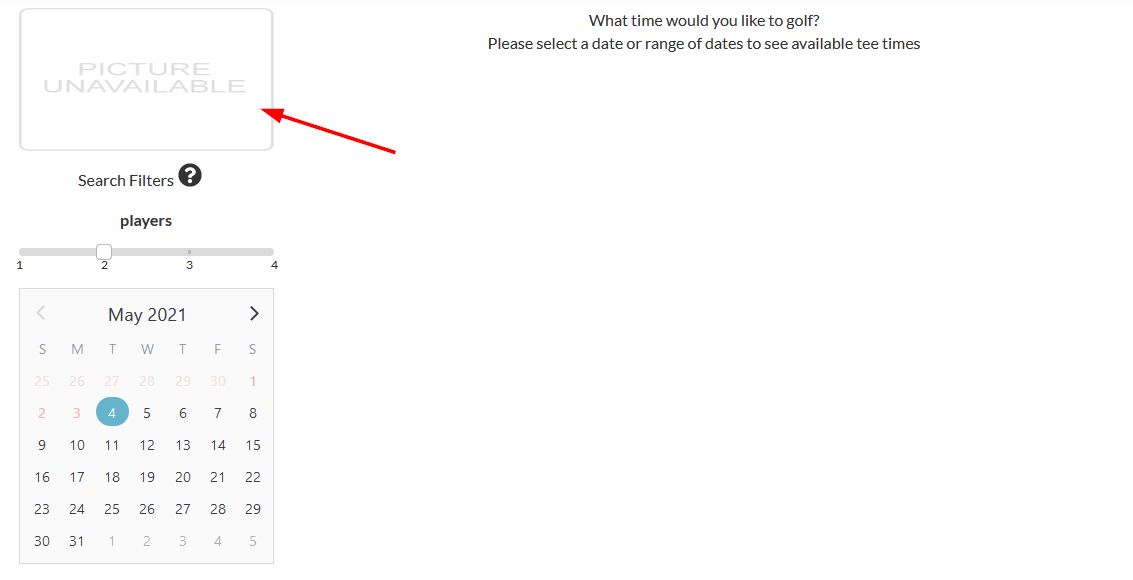
The website, by default, will look for image and description in these default topics:
Teesheet.{courseNameMinusSpaces}.Image
Teesheet.{courseNameMinusSpaces}.Description
This means that if your course was named "Fairway to Heaven" - you would need to set up a topic called "Teesheet.FairwaytoHeaven.Image" where you could upload the image of your course.
You would also want to set up a topic called "Teesheet.FairwaytoHeaven.Description" where you could enter the description of your course.
Was this article helpful?
That’s Great!
Thank you for your feedback
Sorry! We couldn't be helpful
Thank you for your feedback
Feedback sent
We appreciate your effort and will try to fix the article