A common request from AIM Storefront v12 users is to list products with serialized variants. A great example of this is a music store that is selling used clarinets. Since inventory is always changing, and since you want to keep just one product page online for clarinets, you can now list individual, serialized clarinets within the main product. Each serialized variant can have it's own condition, price, images, etc. AIM and AIM Storefront will allow your customers to shop and purchase specific items out of the lot.
There are a few steps to follow to set up your own serialized inventory and although not everyone will be trying to set their store up exactly like our example, understanding the following steps should allow you to create your own serialized inventory setup that works for you.
Requirements
- You must have a functioning AIM security computer (C2B machine)
- You must be on AIM v12
- These instructions assume your product has already been entered into AIM. Please refer to your AIM E-Commerce training to set up your initial product in AIM.
- All images per product must be in the same format (Example All .jpg or all .png. You cannot mix-and-match.
Preparing your product for serialized variants.
To start, open AIM and navigate to "Modules > Inventory > Add/Change Inventory > Change Inventory"
In the upper right corner, enter the SKU/name of the product you wish to search for. We’re going to use a clarinet in our example. Our Clarinet is specifically model “631N”, so we’ll search for that. That will bring up a “Change Inventory” screen that looks like this:
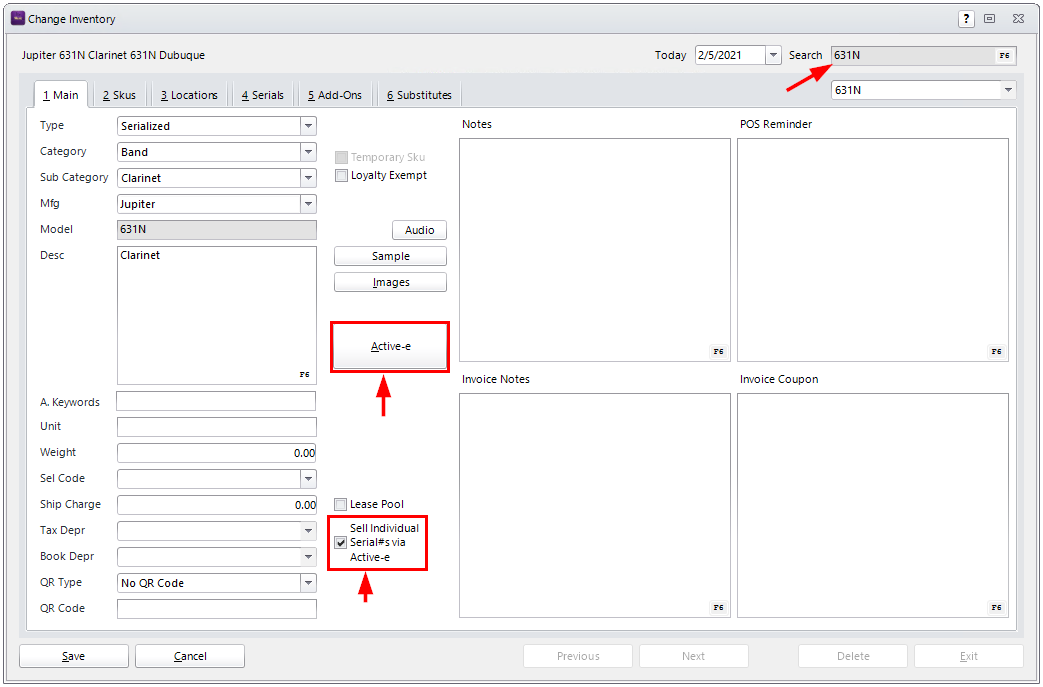
*Click image to zoom
On this screen, be sure to check the "Sell Individual Serial #'s via Active-e" checkbox is checked. If the checkbox is unchecked, please check it and hit "Save" in the bottom left.
Adding the Display Package
Next we need to connect the display package which contains the serialized rules for each product. This is what controls how the product will display on your website.
Above the checkbox we checked in the step above, click the big button for "Active-e".
 *Click image to zoom
You should now see the screen shown above. With your pointer in the XML Package field, right click your mouse to bring up a drop-down. Select "Serialized Variants" Then hit Save, and Exit.
Adding your Serialize Variants
You should be back at the “Change Inventory" screen in AIM, but if not, you can find it again by going to "Modules > Inventory > Add/Change Inventory > Change Inventory" and looking up your product again.
On the “change inventory” screen, select the Serials tab. Here we can add new serialized variants of our product . To create a new serialized variant, select “Add” and fill out your serial#, your code, your pricing, and your stock#.
- Be sure the box for Active-e Holdback is Unchecked.
- Use "Retail" for your pricing. This is the only price that can be displayed for serialized inventory.
- Your page should look similar to the one below:
 *Click image to zoom
When you're done adding and editing your serialized products, hit save on the serialized tab screen and it should take you back to the "Change Inventory" window again.
Adding Images to your Serialized Variants
You can now add an image for your product and multiple images per variant using the Images button. From the main Change Inventory screen, click the "Images" button.

*Click image to zoom
You should now see the image selection screen for the Model: number. You can add a "product" image here that will ONLY show in your Entity Page. (Entity pages are pages that display a group of products, such as a Category page.)
If you click the right arrow button on the lower right corner of the screen, you should see a "Model:xxx -> SKU:xxx" screen similar to the one below. This is where you can upload a single image for your main product page image.

*Click image to zoom
Once you are at the "Model -> SKU" screen, you can click "Add" to add an image for your main product.
Go ahead and click the "right arrow" again, and you should see an option to add an image to your serialized SKU. I've gone ahead and added an image for the CL1003 as well as CL1004 (which were the two serialized variants I had added above).
When you add each image, be sure to check the "Active-e" and "Send" check boxes before saving. My Serialized Variant Inventory Image screen looks like this: 
*Click image to zoom
Multi-Images - You can add multiple images for the model, just use the "Add" button for each additional image.
NOTE: Your second image should be a duplicate of your first image, as it will be the first additional image, and you would want the same as the base product image so you can "return" to it if desired.
Image Format - All images must be jpg images or png images. You cannot use jpgs for one serialized product and a png for the other.
Once you have added all of your images, click Save. This should exit you out of the images window and your product is now ready to upload to your shopping cart.
Uploading your product to your AIM Storefront
After Saving your new product in the "Change Inventory" window, you need to push this product to the storefront to see it as your customers would.
You can do this by selecting the "Active-e" button on the Main tab of the "Change Inventory" window, and then selecting "Upload Item to Shopping Cart" on the "Active-e Maintenance" window.

*Click image to zoom
Once you hit "Upload Item to Shopping Cart", you will need to wait for the product to update.
After a few moments, you may receive a message that some images could not be uploaded, but let's check in the store first.
Viewing your Serialized Products on your Website
If you then go to your website and log into your /aesys admin panel, you can go to "Products > Manage Products" and search for your product name. You should see your product now has an extra variant for each serialized Product.
Notice the variant screen now shows me 3 variants. The Default Variant is the main "product", and will not be for sale on the page. Each of the variants with "1" Inventory represents each of your serialized products.

*Click image to zoom
It might make a bit more sense when you see it on the client facing product page.

*Click image to zoom
Clicking on any of the serialized products will now show and Add to Cart button specific to each individual serialized product.

*Click image to zoom
Should you have any questions along the way, you can submit a support ticket or email us at AIMstorefront@vortx.com . You can view our full library of helpdesk solutions here.
Please let us know if this article is helpful to you by selecting one of the choices below:
Was this article helpful?
That’s Great!
Thank you for your feedback
Sorry! We couldn't be helpful
Thank you for your feedback
Feedback sent
We appreciate your effort and will try to fix the article