After placing an e-Commerce order on your site, your customers may need to know when their order has been shipped. Your AIMStorefront is ready to send that email. Below you will learn how to:
- Be sure your site is sending a shipped notification
- Send a shipped notification
- Edit your shipped notification
Be sure your site is sending a shipped notification
If your site can send emails, your site can send shipped notifications. You shouldn't need to change any of these settings, but it's best to double check and test your email settings under Configuration > Setup E-Mail first.
Near the bottom of the Setup E-Mail page, you want to look at this field: 
Then make sure your shipped email is using the proper xml package. Configuration > Settings.
The setting XmlPackage.OrderShipped should have a value of notification.shipped.xml.config

You should be all set.
Send a shipped notification
In order to send a shipped notification, we need to find an order that needs to be shipped. In this example, I've placed a test order on an AIMSF v1.44 testing website.
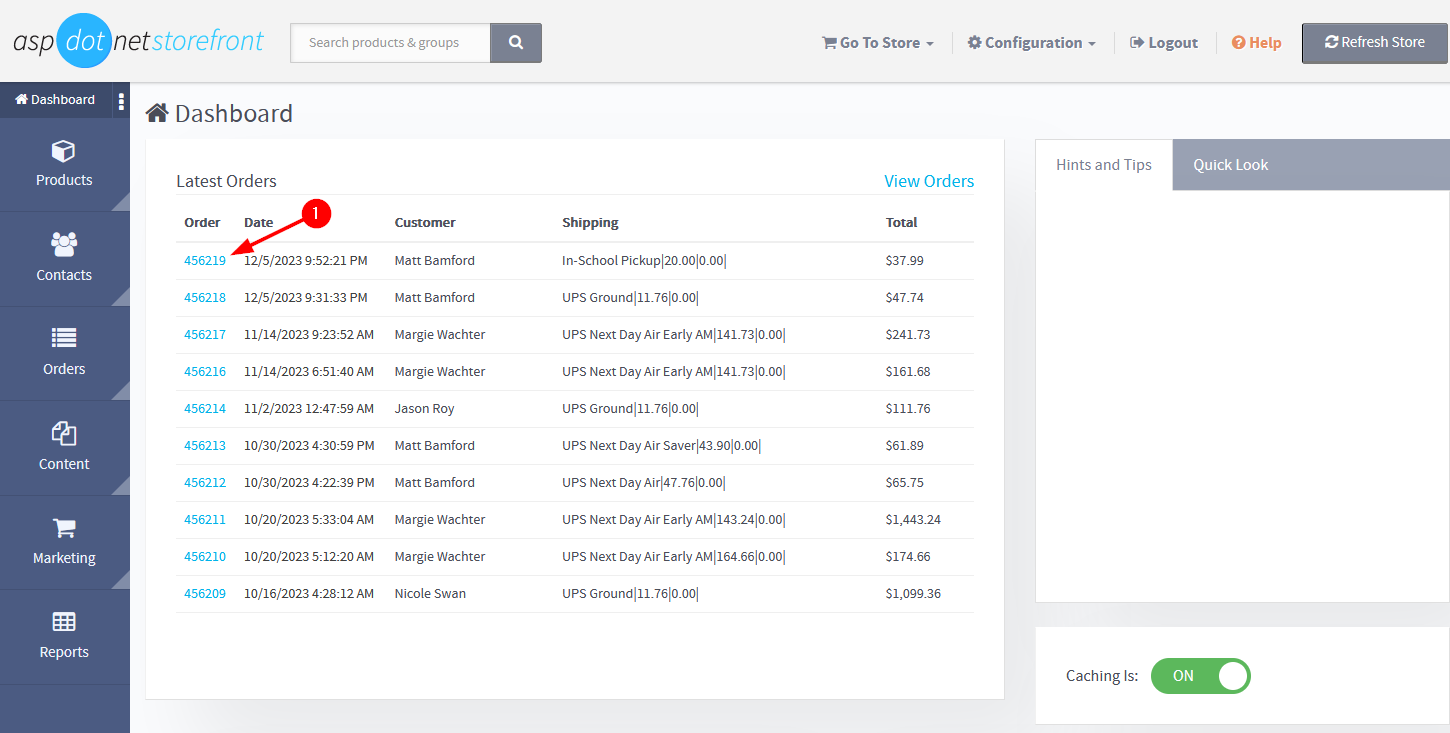
Let's find our order. I can either see it on the dashboard of my admin panel (/aesys) and click the blue link with the order number...
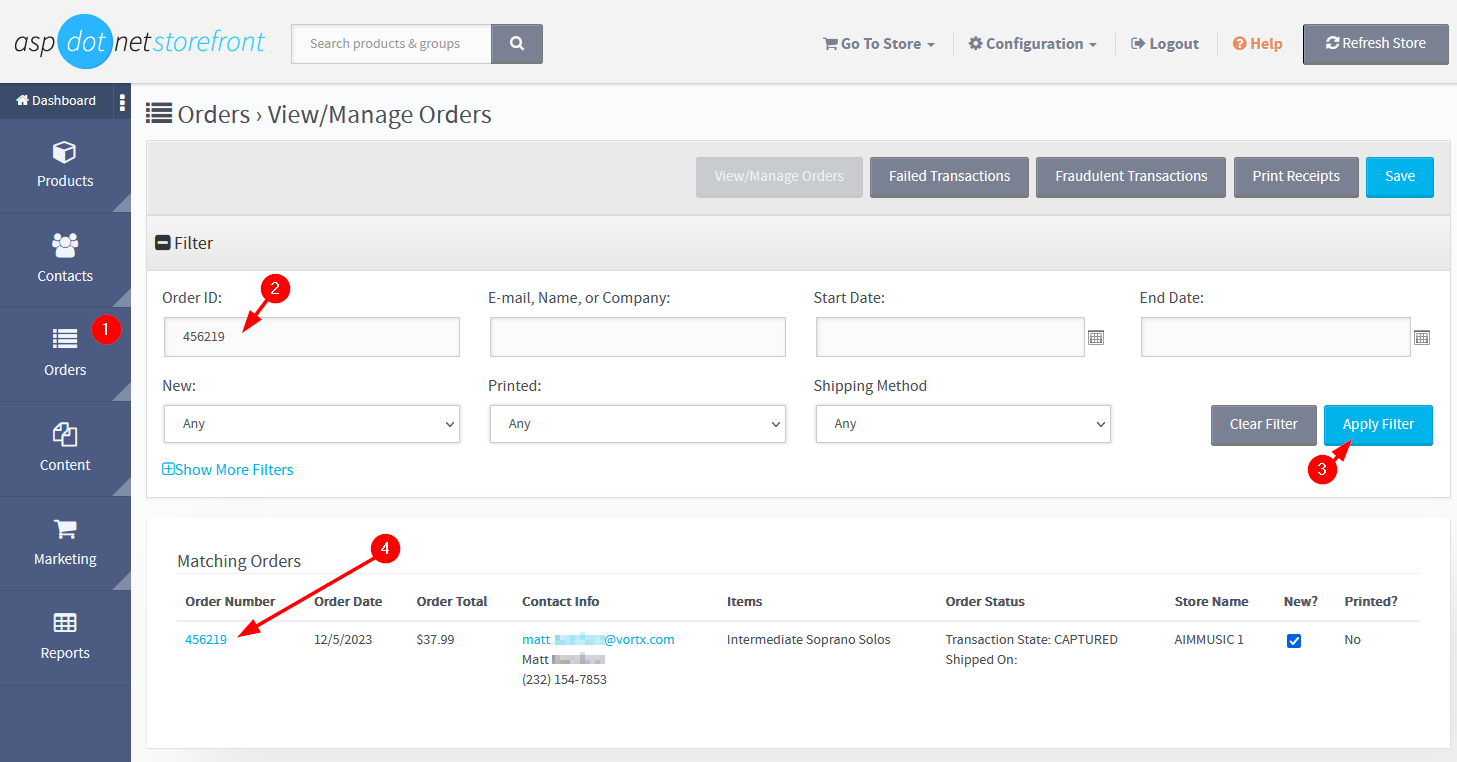
or I can use the Orders navigation button > Manage Orders, and then filter our results here. In this case, I've searched for my order number, but I could have used email, or a date range. Once I see my order, I click the blue link with the order number...
Now that our order is on the screen, simply select your Shipped On: date, add your Carrier:, and add your Tracking Number: if you have one. The Tracking Number is optional.

Once you click Mark as Shipped and Confirm that you want your customer to be emailed, your customer will receive an email like this:

Edit your shipped notification
Warning: When you open this topic, be sure to copy the contents of this topic to a notepad and save.
Currently, there is not a "roll-back" feature on this topic, so if you are unhappy with any edits to the code, you'll need to use your own saved code to revert. Only save this topic if you are sure you can roll back without assistance from Vortx. We may be able to help in an emergency but it is best to keep a back up of the topic contents.
In order to edit your email template, you'll need to be sure you're using Custom Email Templates.
To ensure Custom Email templates are turned on, check Configuration > Settings, and search for Email.UseCustomEmails and make sure that is set to a value of 'True'.

If it's 'False', click on the setting name and change its value to 'True', save your changes and then make sure to hit the 'Refresh Store' button located in the upper right of the admin console.
Now go to Content > Manage Topics and search for a topic named Email.Templates.ShippedNotification

When you open this topic, be sure to copy the contents of this topic to a notepad and save.
There is not a quick rollback feature on this topic, so if you are unhappy with any edits to the code, you'll need to use your saved code to revert. Only save this topic if you are sure you can roll back without assistance from Vortx. This is the code the topic will ship with if you need to revert back to day 1:
<html>
<head>
<link rel="rel" type="text/css" href="{{StyleUrl}}"></link>
<title>
{{Title}}
</title>
</head>
<body>
<div style="font:normal 10pt Arial;color:#000080;">
<p>
We just wanted to update you and let you know that your order {{OrderNumber}} has shipped via {{ShippedVia}} on {{ShippedOn}}.
</p>
<p>
Here is your Tracking Number (if available):
{{#IF TrackingNumber}}
<a href="{{TrackingUrl}}">{{TrackingNumber}}</a>
{{#ELSE}}
No tracking number available.
{{/ELSE}}
{{/IF}}
</p>
<p>
Thanks for shopping at <a href="{{StoreUrl}}">{{StoreName}}</a>.
</p>
</div>
<div style="font:normal 10pt Arial;color:#000080;">
<strong>
<a href="{{StoreUrl}}">{{StoreName}}</a> Customer Service
</strong>
</div>
<p>
<font face="Arial" size="1">
Please note: Replies to this email will not be answered. If you require assistance please visit our website for contact information.
</font>
</p>
<p> </p>
</body>
</html>You'll notice in this "Mustache" html template, you'll see tags that are indicated by the double mustaches. These bring your unique values into the email template as the website creates the email. If you are familiar with html and can understand mustache tags, you will be able to edit and save this template to fit your own use.
Tags that can be used include:
{{StyleUrl}}
{{Title}}
{{OrderNumber}}
{{ShippedVia}}
{{ShippedOn}} (Date)
{{TrackingNumber}}
{{TrackingUrl}}
{{StoreName}}
{{StoreUrl}}
Was this article helpful?
That’s Great!
Thank you for your feedback
Sorry! We couldn't be helpful
Thank you for your feedback
Feedback sent
We appreciate your effort and will try to fix the article